
Building a deck at ground level is a great way to add extra living space to your home. A ground-level deck is also called a floating deck because it does not attach to the house. Floating decks are easy to build and can be added on to an existing patio or porch.
The first step in building a ground-level deck is to excavate the area where the deck will be built. Then, fill the excavation with gravel and compact it. Next, install pre-made concrete footings or pour concrete footings yourself.
Once the footings are set, you can begin installing the joists anddecking boards. Finally, add railings and stairs if desired. Ground-level decks are an excellent addition to any home!
Building a Deck at Ground Level One of the best things about summer is being able to spend time outdoors enjoying the warm weather. If you have your own backyard, that’s even better!
If you’ve been thinking about adding a deck to your home but aren’t sure where to start, this post is for you. We’ll walk you through the process of building a ground-level deck step by step. Before we get started, there are a few things you should keep in mind.
First, it’s important to choose the right location for your deck. You’ll want to pick a spot that gets plenty of sunlight and isn’t too close to any trees or other structures. Second, make sure you have all the necessary permits and approvals from your municipality before starting construction.
Once you have those taken care of, you can move on to Step 1!
Step 1: Plan Your Deck The first step is to sit down and plan out your deck.
Decide how big you want it to be and what shape it will take. Keep in mind that a rectangular or square deck is usually easiest to build. Once you have the basic layout figured out, it’s time to start thinking about what kind of materials you want to use.
Pressure-treated lumber is often used for decks because it’s durable and inexpensive. However, if you want something more high-end, cedar or composite boards are also options worth considering. Once you know what materials you want to use, it’s time to calculate how much lumber you’ll need for the project using this handy formula: (length ofdeck boards x width of deck boards) / 12 = number of board feet needed .
For example ,if your deck will be 10 feet long and 6 feet wide ,you ‘ll need ((10×6)/12) = 50 board feetof lumber . Don ́t forgetto factor in extra boards for stairs , railings ,and trim ! When in doubt ,it ́s alwaysbetter tobuy more lumber than less –you can always return any unused materialsto the store later on . Now that everything is planned out ,you ́re readyfor Step 2 !
Building A Ground Level DECK – (Part 1)
How to Build a Flush Ground Level Deck
If you have ever wanted to build a deck but were intimidated by the height, then a flush ground level deck is perfect for you! This type of deck is built right on the ground and is flush with the ground level, making it much easier and safer to build. Plus, this type of deck is great for entertaining since there are no stairs to trip over.
Here is how you can build your very own flush ground level deck:
1) The first step is to mark out where your deck will go. Use a tape measure to find the dimensions of your desired deck area and then use stakes and string to mark it out.
2) Next, you will need to excavate the area for your deck. Be sure to dig down at least 6 inches so that your foundation is secure.
3) Once the excavation is complete, it’s time to lay down your foundation. We recommend using concrete footings or piers for extra support. Simply pour the footings into each hole and then use a leveler to make sure they are even. Allow them to cure according to package instructions before moving on.
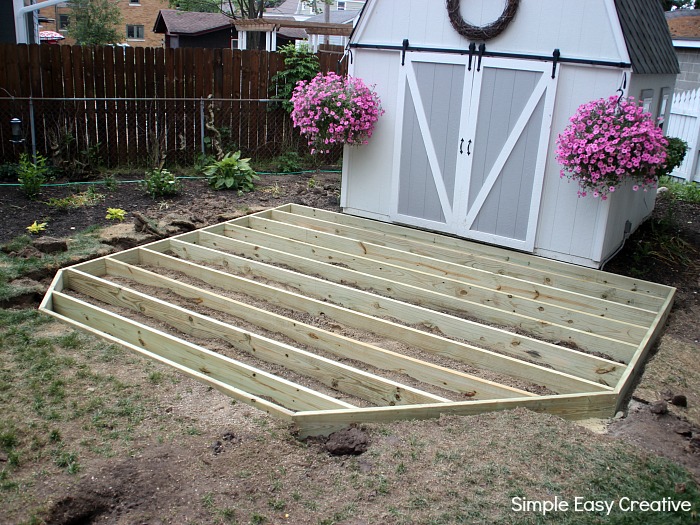
4) Now it’s time for framing! Begin by attaching 2×6 boards around the perimeter of your foundation using nails or screws (we recommend using galvanized nails or screws specifically designed for outdoor use). Then, add additional joists every 16 inches on center until all of your framing is complete.
5) To finish things off, add in plywood sheets as flooring for your new deck space! You can either screw them directly into the frame or use construction adhesive if you want a more permanent solution. And that’s it – enjoy your brand new flush ground level deck!
How to Build a Floating Deck
A floating deck is a great way to expand your outdoor living space.Building a floating deck is relatively easy and can be done in just a few hours. Here’s how to do it:
1. Choose the location for your deck. You’ll need a level spot that doesn’t flood during storms.
2. Clear the area of any debris, rocks, or roots.
3. Measure out the size of your deck using stakes and string. Mark the corners with marker flags so you know where to dig.
4. excavate the area for your footing about 6 inches deep and 2 feet wide around the entire perimeter of your planned deck space using a shovel or rent an excavator from a hardware store . Be sure to call 811 before you dig!
This will help avoid any underground utility lines. Fill the excavation with gravel and pack it down firmly .
Building a Floating Deck on Uneven Ground
When you have a lawn that slopes, it can be difficult to know what to do with the space. If the slope is significant, you may not be able to have much of a yard at all. But there is hope!
You can build a floating deck on uneven ground. Here’s how:First, you will need to create a level base for your deck.
To do this, excavate the area where your deck will be located. Then, use gravel or sand to level out the area. Once your base is level, you can begin building your floating deck frame.
Next, you will need to install joists and cross-bracing to support your decking boards. When installing the joists, make sure they are perpendicular to the beam so that they don’t sag over time. Also, it’s important to stagger the joints so that they don’t line up directly above each other (this will make your deck stronger).
Finally, secure the cross-bracing at each joint with screws or nails.Now you’re ready to install your decking boards! Start from one end of your frame and work your way towards the other end (securing each board as you go).
Be sure to leave enough space between each board for expansion and contraction (usually about ¼ inch). And once all of your boards are in place, enjoy your new floating deck on uneven ground!
How to Build a Deck for Dummies
Building a deck can be a daunting task for even the most experienced do-it-yourselfer. But with a little planning and the right tools, anyone can build a beautiful deck to enjoy for years to come. If you’re thinking about adding a deck to your home, here’s what you need to know to get started:
1. Decide on the size and shape of your deck. Do you want a large entertaining space or a more intimate gathering spot? Will it be rectangular, square, or curved? Sketch out your plans on paper or use online design software to help you visualize your dream deck.
2. Choose the location for your deck carefully. You’ll want to consider things like sunlight, privacy, and traffic flow when deciding where to put your deck.
3. Get familiar with local building codes and obtain any necessary permits before beginning construction. This will save you time and money in the long run by ensuring that your deck is up to code.
4. Once you have all of your materials and tools gathered, it’s time to start building! Begin by attaching the ledger board (the horizontal beam that will support one end of your deck) to the house using lag screws or through-bolts . Then add joists (support beams) running perpendicular to the ledger at 16″ intervals . These will support the floor boards of your deck once they’re installed.
5. Install floorboards , starting at one end of the joist structure and working towards the other end . Be sure to leave adequate space between each board for drainage .
6. To finish off your deck, install railings along the edges using posts set firmly in concrete footings . And there you have it! Your very own DIYdeck!
How to Build a Small Deck Platform
Building a small deck platform is relatively easy and can be done in a few hours. The most important thing to remember when building any type of deck is to make sure the foundation is level and square. Once the foundation is set, you can begin attaching the joists.
It is important to use proper spacing when attaching the joists so that the decking boards will lay flat and not warp over time. After the joists are in place, you can start installing the decking boards. Be sure to use screws or nails that are long enough to go through the thickness of the wood and into the joist so that they will be secure.
When all of the decking boards are in place, you can finish off your project by adding trim around the edge of your new platform.
Can I Build a Deck Directly on the Ground?
It’s possible to build a deck directly on the ground, but it’s not recommended. If you do choose to build your deck this way, be sure to use pressure-treated lumber and consider sealing or staining the wood to protect it from moisture and insects. Building a raised deck is a better option if you’re concerned about these things.
Is a Ground Level Deck a Good Idea?
If you’re thinking about adding a deck to your home, you may be wondering if a ground level deck is a good idea. There are a few things to consider before making your decision.First, think about how you’ll be using your deck.
If you plan on entertaining guests or hosting parties, a ground level deck might not be the best option. decks at ground level can sometimes feel cramped and crowded, and it may be difficult to move around freely. If you just want a place to relax and enjoy the outdoors, however, a ground level deck can be a great choice.
Another thing to keep in mind is maintenance. Ground level decks can be more prone to dirt and debris build-up than elevated decks. You’ll need to sweep and clean your deck more often to keep it looking its best.
Finally, consider your budget and the overall cost of building a ground level deck. In general, these types of decks are less expensive than raised decks because they require less materials and labor hours.
Does a Ground Level Deck Need Footings?
One of the most common questions we get about building a ground level deck is “Do I need footings?” The answer is maybe. In some jurisdictions, you don’t need any footings for a ground level deck because it isn’t attached to your house.
If your deck is going to be more than 2 feet off the ground, you will probably need footings regardless of whether or not your jurisdiction requires them. And if you live in an area with high winds, you may want to consider putting your deck on piers instead of footing so that it can be easily removed in case it gets damaged.The reason why you might need footings for a ground level deck has to do with the frost line.
The frost line is the depth at which the ground freezes in winter. In many areas, the frost line is several feet below the surface of the ground. This means that if you put your deck posts directly into the ground, they could shift when the ground freezes and thaws.
Footings help prevent this by anchoring the posts into something that doesn’t move – like concrete or gravel.Another reason why you might want to consider footing for your ground level deck has to do with soil type. If you have very loose, sandy soil, it could shift under the weight of your deck and cause it to collapse – even if there’s no risk of frost heave.
Soil that contains a lot of clay can also expand and contract as it absorbs moisture from rain and snowmelt, which can again lead to instability and potential collapse. Putting your deck on footings helps mitigate these risks by spreading out the weight over a larger area and creating a more stable foundation.
What Do You Put under Ground Level Deck?
One of the most important things to consider when building a deck is what you will put under the deck. This may seem like a small detail, but it can actually make a big difference in the overall stability and look of your deck. There are several different options available for under your deck, each with its own set of benefits and drawbacks.
One popular option is to use gravel. Gravel is relatively inexpensive and easy to install. It also provides good drainage and can help to stabilize the soil beneath your deck.
However, gravel can be difficult to keep clean and can wash away over time.Another option is to use pavers. Pavers are more expensive than gravel but they provide a more finished look.
They are also easier to keep clean and are less likely to wash away over time. However, pavers can be slippery when wet and may need to be sealed periodically to maintain their appearance.Finally, you could also use concrete blocks or poured concrete as a base for your deck.
These options provide the most stability but are also the most expensive. If you choose one of these options, be sure to consult with a professional about the best way to prepare the surface before installation.
Conclusion
If you have a backyard that is level with the ground, you may want to consider building a deck. This can be a great DIY project for those who are handy and have some basic carpentry skills. Building a deck at ground level is different than building one that is elevated, so it is important to know how to do it correctly.
The first step is to determine where you want your deck to be located. Then, you will need to excavate the area and remove any sod or vegetation. Next, you will need to install the joists and beams that will support your decking boards.
Once everything is in place, you can then begin installing your decking boards. Start from the outside edge and work your way inwards. Be sure to use screws or nails that are long enough to go through the thickness of the wood and into the joists below.
When you reach the end of each row of boards, cut them off so they are flush with the edge of the frame.Building a ground level deck can be a fun and rewarding DIY project. Just be sure to follow these tips so your deck turns out looking great and lasts for many years!


Dora Cain
Hey, My pen name Dora Cain and my team writing about our experiences on this blog. Please Follow us to get updated on the trend. A bit about me I always looking for ways to explore the beauty of nature. I'm a passionate hunter and camper, with a deep appreciation for wildlife and the environment. I've been hunting since I was young, learning from my father how to take care of the land and respect its resources. My passion for camping has taken me all over the country, allowing me to experience some of the most stunning landscapes in existence. From mountain peaks to open fields, there's something special about being out in nature that can't be replicated indoors. Hunting is also an important part of my life; it allows me to not only hone my skills but also provides me with sustenance as well as a connection with nature that is unmatched.


