
1. The first step is to measure the length of your fence. This will help you determine how many posts you need and where to place them.
2. Next, mark the location of each post with a stake or piece of string. Make sure that the spacing between each post is even.
3. Once you have marked the locations of your posts, it’s time to start digging! The hole for each post should be about 2 feet deep.
4. To make sure that your posts are level, use a level when you are placing them in the holes. Fill the holes with concrete and allow it to dry completely before continuing.
5. After the concrete has dried, you can attach your fence panels or pickets using nails or screws.
- Choose the location for your fence posts
- The posts should be placed at least two feet into the ground
- Mark the placement of your fence posts with string or chalk
- Use a post hole digger to dig each post hole to the appropriate depth
- Place your fence posts into the holes and fill them with concrete, making sure that they are level as you go along
- 5a) If using wooden fence panels, nail them into place once the concrete has set
- 5b) If using chain link fencing, attach it to the metal posts once the concrete has set
How to Set and Plumb(Level) Fence Posts | Wood Fence
How to Set a Fence Post by Yourself
If you’re planning on installing a fence in your yard, one of the most important steps is setting the fence posts. This can be a tricky task if you’re doing it by yourself, but with careful planning and execution it can be done successfully. Here are some tips on how to set a fence post by yourself:
1. Choose the right location for your fence post. It’s important to pick a spot that’s level and firm, otherwise your post could end up leaning or even falling over.
2. Dig a hole that’s about twice the size of your fence post. The depth will depend on how tall your fence is going to be – for a 6 foot tall fence, you’ll need to dig at least 3 feet down.
3. Put your fence post into the hole and make sure it’s level before filling in the hole with dirt or concrete. If you’re using concrete, mix it according to the instructions and pour it around the base of the post until it’s completely filled in.
How to Set a Fence Post Without Concrete
One of the most important things when it comes to setting a fence post is making sure that it is done correctly. This means that the post needs to be set in concrete, which can be a difficult and time-consuming process. However, there are ways to set a fence post without concrete.
This can be done by using other materials such as gravel or sand. The most important thing is to make sure that the post is level and stable.There are several benefits to setting a fence post without concrete.
One of the biggest advantages is that it can save you a lot of time and effort. Concrete can take hours to dry, so if you’re in a hurry, this method might be better for you. Additionally, it’s not always necessary to use concrete when setting posts.
If the ground is soft enough, you might be able to get away with using another material like gravel or sand.If you’re interested in learning how to set a fence post without concrete, there are plenty of resources available online. You can find helpful tutorials and tips from experienced DIYers.
With a little research, you should be able to find everything you need to know about this fencing technique!
How to Level a Fence Line
A fence is a structure that delineates an area, typically outdoors, and is usually constructed from posts that are connected by panels, wire, or boards. Fences are used to keep animals in or out of an area, to mark property boundaries, and to enhance the aesthetic appeal of a home or business. When installing a fence, it is important that the fence line be level so that the fence looksStraight and professional.
Here are some tips on how to level a fence line:
1) Use a string line: This is probably the easiest way to make sure your fence line is level. Simply attach a string line at one end of your proposed fenceline, making sure the string is tight.
Then stretch the string out along the length of your fenceline and use it as a guide when setting your posts. As you set each post, check it with a level to ensure it’s plumb (vertical), then adjust as necessary before moving on to the next post.
2) Use transit levels: If you have access to transit levels (also called builder’s levels), you can use these more sophisticated tools to create a perfectly level fenceline.
Transit levels work by suspending a bubble-filled tube in such a way that when the tube is perfectly horizontal, the bubble will be centered in its viewfinder. To use transit levels for leveling your fenceline, simply set up one end of your proposed fenceline at ground level and sight along the length of your transit level until you find the bubble centered in its viewfinder. Then move down the length of your transit level until you find another point where the bubble is centered; this second point should be at exactly the same elevation as your first point.
Once you’ve established two points that are both at ground level and have equal elevations according to your transit level reading, simply connect these points with string or flags to create your perfectlyleveledfenceline!
How to Measure Height of Fence Post
Are you in the process of installing a fence? If so, then you’ll need to know how to measure the height of your fence posts. Measuring the height of your fence posts is important because it will determine the size and type of fence that you can install.
It’s also important to make sure that all of your fence posts are uniform in height, which will give your fence a professional appearance. Here’s a step-by-step guide on how to measure the height of your fence posts:
1) Use a tape measure to determine the overall height of your desired fence. This measurement should be taken from the ground up.
2) Once you have determined the desired height of your fence, use a marking tool to mark where each post will be placed. Make sure that these marks are level with each other.
3) Place a post at each marked location and use a level to make sure that it’s plumb (vertical). Use a tape measure to take note of the distance between each post. This measurement will be used to calculate the actual height of each individual post.
4) To calculate the actual height of each post, add 2 feet (24 inches) to whatever measurement was taken between each post using the tape measure. For example, if it measured 6 feet between two posts, then those posts would need to be 8 feet tall (6 + 2 = 8). The extra 2 feet accounts for both digging into the ground and adding concrete footing underneath each post.
5) Repeat this process until all posts have been measured and installed accordingly!
How to Install 4X4 Post in Ground
Installing a 4×4 post in the ground may seem like a daunting task, but it’s actually quite simple. Here are the basics of how to do it:
1. Choose your location. You’ll want to pick a spot that is level and free of any obstacles. It’s also important to consider things like underground utilities when choosing your location.
2. Mark the location of your post. Using a shovel or other sharp object, make a small mark in the ground where you want your post to go. This will help you keep track of where you need to dig.
3. Dig your hole. Once you’ve marked the spot, begin digging your hole with a shovel or auger. The hole should be about 2 feet deep and wide enough to fit the 4×4 post snugly.
4. Add gravel to the bottom of the hole for drainage purposes (optional). If you’re concerned about water pooling around your post, you can add some gravel to the bottom of the hole before inserting the 4×4 post . Simply pour in a few handfuls and tamp down lightly with your shovel .
How to Set a Post
Assuming you would like a blog post titled “How to Set a Post”, here are some tips:-First, determine what kind of post you would like to create. There are many different types of posts, such as informative, opinionated, or even humorous.
-Next, come up with a catchy headline that accurately reflects the content of your post.
-Then, start writing! Be sure to include any relevant information or anecdotes that will engage your readers.
-Once you’re finished writing, proofread your work and make any necessary edits.
-Last but not least, hit publish and share your post with the world!
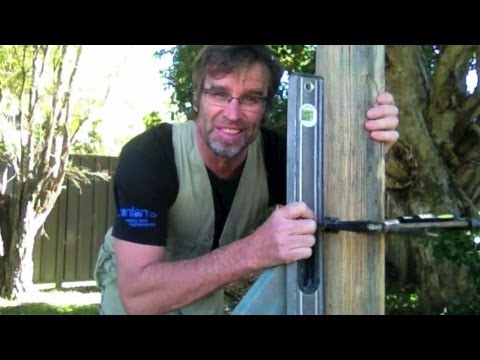
Fence Level Tool
If you’re looking for an easy way to level your fence posts, the Fence Level Tool is a great option. This tool can be used on both wood and metal fences, and it’s designed to help you get a perfect level every time. Simply attach the Fence Level Tool to your post, and then use the built-in level to ensure that your post is perfectly straight.
The Fence Level Tool is also great for ensuring that your fence panels are level with each other. No more mismatched or lopsided fence panels!
How to Keep Post Level While Concrete Dries
When pouring concrete, it is important to make sure that the post level stays level as the concrete dries. There are a few different ways that you can achieve this. One way is to use a leveler.
This tool helps to ensure that the post is level with the ground and will not move as the concrete dries. Another way to keep the post level while concrete dries is by using stakes. The stakes will help keep the post in place and also help to hold it up if there is any weight on top of it.
Finally, you can also use sandbags or bricks to help keep the post level while concrete dries. By using one or more of these methods, you can be sure that your post will stay level and not sink into the ground as the concrete dries.
How Do You Level Fence Posts on Uneven Ground?
Building a fence is a big undertaking, but it’s worth it to have the privacy and security that a fence can provide. If you’re planning on building a fence, one of the first things you’ll need to do is level the posts. This can be tricky if your ground is uneven, but there are a few different ways you can go about it.
One option is to use concrete footings for your posts. To do this, you’ll need to dig holes for each post that are at least 12 inches deep. Once the holes are dug, fill them with concrete and then set your posts in place.
The concrete will help to level out the posts and keep them in place.Another option is to use wooden stakes instead of concrete footings. To do this, drive the stakes into the ground next to each post hole.
Then, tie string or twine around each stake and post so that they’re snug against each other. As you backfill the hole with dirt, the string will help keep the posts level as they’re being buried in dirt.No matter which method you choose, leveling your fence posts on uneven ground doesn’t have to be difficult.
With a little planning and effort, you can get your fence up in no time!
How Do You Ensure a Fence Post is Aligned?
Building a fence is a big investment and you want to make sure it’s done right. Part of that is ensuring your fence posts are aligned correctly. Here are some tips on how to do that:
1. Use a string line: This is probably the easiest way to make sure your fence posts are aligned. Simply stretch a string line between the two end posts and then measure from the string line to each of the other posts to make sure they’re all in line.
2. Use an electronic level: If you have an electronic level, you can use that to check that each post is level with the others. Just set the level on top of each post in turn and make sure the bubble is in the center.
3. Use a laser level: A laser level is even easier to use than an electronic level and will give you a more accurate reading. Simply set up the laser level at one end of the fence line and then check that each post lines up with the beam.
4. Check by eye: This isn’t always as accurate as using one of the above methods, but if you’re just doing a small section of fence it can be sufficient. Walk along the length of the fence checking that each post is lined up with those either side of it.
How Do You Level a Fence Post in Concrete?
If you’re putting up a fence, you’ll want to make sure your posts are level. Here’s how to do it:
1. First, dig a hole for your post. The depth of the hole should be 1/3 the height of the post, plus 6 inches (for example, if your post is 8 feet tall, you’ll want to dig a hole that’s 2 1/2 feet deep).
2. Next, fill the bottom of the hole with 6 inches of gravel. This will help with drainage.
3. Set your fence post in the hole and make sure it’s level. Use a level or a plumb line to check it.
4. Once it’s level, fill the rest of the hole with concrete mix. Make sure to pack it in tightly around the post so that it sets up correctly.
5. Let the concrete dry for 24 hours before putting up any fencing material on top of it (otherwise, the weight could cause it to crack).
How Do I Make Sure Posts are the Same Height?
When creating blog posts, you may want to ensure that all of your posts are the same height. This can be accomplished by a few different methods.One way to keep all of your posts the same height is by using equal-height columns.
To do this, you will need to use a CSS grid system. There are a few different CSS grid systems that you can choose from, but we recommend using the Bootstrap grid system.Once you have chosen a CSS grid system, you will need to create two or more columns within your blog post layout.
Then, you will need to add the class “equal-height” to each of these columns. By doing this, each column will be given an equal amount of space regardless of its content size. This ensures that all of your posts are the same height.
Another way to keep all of your posts the same height is by setting a fixed height for each post. To do this, you will need to add the following CSS rule to your stylesheet: .post { height: 300px; } .
post img { max-width: 100%; width: auto; }This CSS rule sets a fixed height of 300px for each blog post and also ensures that any images within the post are automatically resized so they don’t exceed the fixed post height. As long as all of your posts have similar content (e.g., text and one or two small images), this method should work well and result in evenly-sized posts across your blog.
If you want even more control over how tall each post appears on your blog, you can try using the viewport unit vh (viewport units). Viewport units allow elements on a page to be sized relative to the viewport size (i.e., how much of the page is visible on screen). So if we wanted our blog posts to take up 50% of the viewport’s vertical space, we could use this CSS rule: .
post { height: 50vh; } .post img { max-width: 100%; width: auto; }With this method, it’s important to remember that different users will see different heights for their blog posts depending on their device’s viewport size (e.g., desktop users will see taller posts than mobile users).
Conclusion
Whether you’re installing a new fence or repairing an old one, it’s important to make sure the fence posts are level. Not only will this ensure that your fence looks straight and professional, but it will also help keep the fence stable over time. There are a few different ways to level fence posts, and the method you use will depend on the type of post and the tools you have available.
With a little patience and care, you can easily level any fence post!


Dora Cain
Hey, My pen name Dora Cain and my team writing about our experiences on this blog. Please Follow us to get updated on the trend. A bit about me I always looking for ways to explore the beauty of nature. I'm a passionate hunter and camper, with a deep appreciation for wildlife and the environment. I've been hunting since I was young, learning from my father how to take care of the land and respect its resources. My passion for camping has taken me all over the country, allowing me to experience some of the most stunning landscapes in existence. From mountain peaks to open fields, there's something special about being out in nature that can't be replicated indoors. Hunting is also an important part of my life; it allows me to not only hone my skills but also provides me with sustenance as well as a connection with nature that is unmatched.


